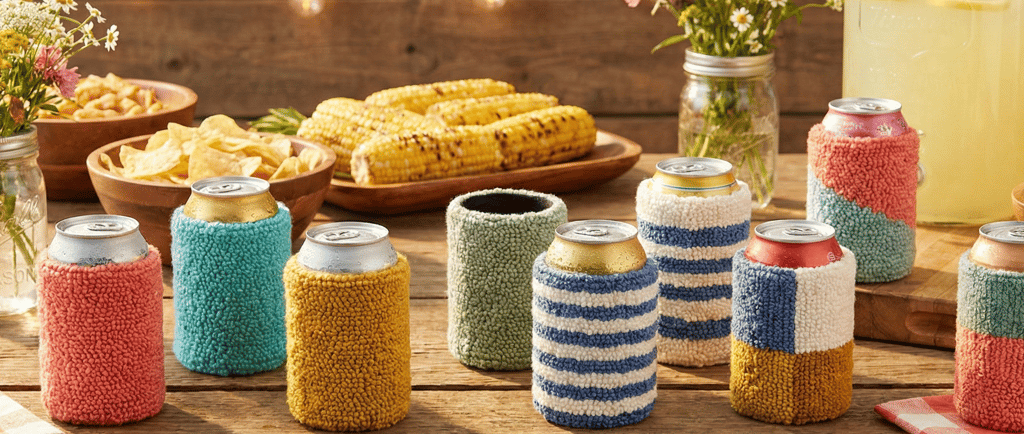
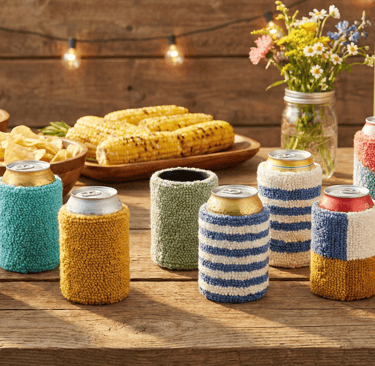
DIY Tufted Drink Koozies: The 20 Minute Beginner Project That'll Actually Get Used
Learn how to make cute tufted drink koozies in just 20 minutes! Easy beginner tutorial with supplies from Amazon. Functional, fun, and actually useful!
PROJECTSHOW TO
2/8/202613 min read
DIY Tufted Drink Koozies: The 20-Minute Beginner Project That'll Actually Get Used
FTC Disclaimer: This post contains affiliate links to Amazon products. If you purchase through these links, I may earn a small commission at no additional cost to you. These commissions help keep TuftMom running and my yarn collection growing. I only recommend products I genuinely believe will help your tufting journey!
Look, I'm gonna level with you. You bought a tufting gun thinking you'd make gorgeous statement rugs for every room in your house. But here you are, three weeks later, staring at that gun like it's a complicated relationship you're not ready to commit to. The learning curve feels steep, you're intimidated by big projects, and honestly? You just want to make something cute without dedicating your entire weekend to it.
I see you. And I've got the perfect solution.
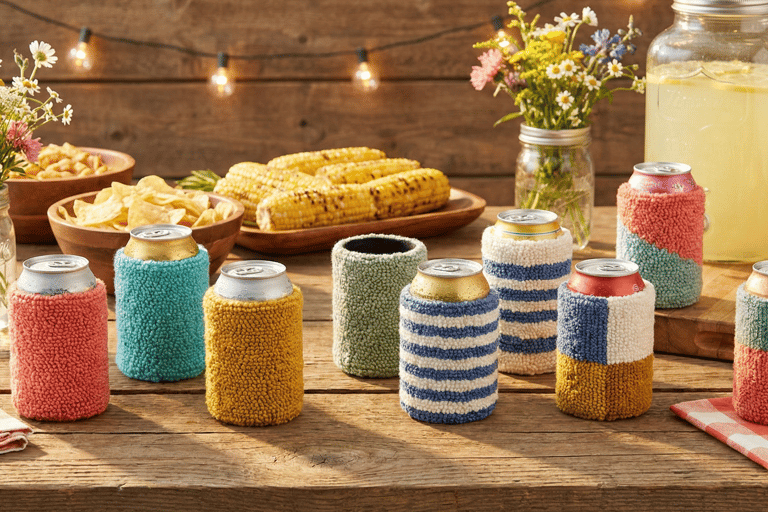
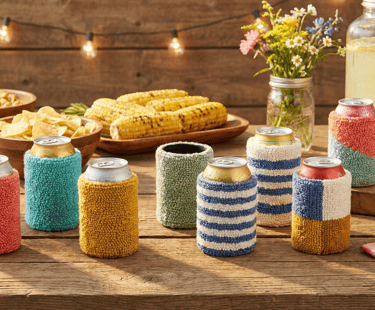
Enter the tufted drink koozie—quite possibly the most underrated beginner tufting project ever. We're talking 20 minutes from start to finish. We're talking using supplies you probably already have lying around. We're talking about something you'll actually use instead of shoving in a closet because "maybe someday it'll match my decor."
Your cold drinks deserve better than those sad foam koozies with corporate logos from that trade show you went to in 2019. Let's tuft something better.
What Makes Tufted Koozies Perfect for Beginners
Here's why tufted koozies are about to become your new favorite project:
They're stupid fast. I'm talking 15-20 minutes per koozie once you get the hang of it. You can make a whole set during one episode of your favorite show. Finally, a craft project that doesn't require you to cancel weekend plans.
They're actually functional. Unlike that experimental wall hanging gathering dust in your closet, you'll use these. Every. Single. Day. Cold drink? Grab your tufted koozie. Pool party? Bring your tufted koozies. Camping trip? You get it.
The stakes are wonderfully low. Mess one up? Cool, you spent 20 minutes and maybe a dollar in yarn. Try again. The emotional investment here is minimal, which is exactly what you need as a beginner.
They make ridiculously good gifts. Housewarming? Check. Secret Santa? Perfect. That friend who has everything? They don't have a handmade tufted koozie, I promise you.
They use minimal supplies. You don't need a giant frame or pounds of yarn. A small embroidery hoop and some scrap yarn will do. Your wallet will thank you.
They're forgiving. The cylindrical shape hides a multitude of beginner sins. Uneven loops? The curve camouflages it. Wonky color transitions? Adds character. You're basically set up to succeed here.
What You Need to Make Tufted Koozies
The Absolute Essentials
Cut Pile Tufting Gun - Same trusty gun you'd use for any project. If you've been eyeing one but haven't pulled the trigger (pun intended), koozies are an excellent reason to finally buy one. Budget-friendly models work perfectly fine for this.
Primary Tufting Cloth or Monk's Cloth - You need maybe a fat quarter to make several koozies. That's like 18x22 inches. One yard makes approximately a million koozies. (Okay, maybe just 12-15, but still.)
Small Embroidery Hoop (6-8 inches) - Perfect size for working on koozie strips. You can find these for under $10 on Amazon. Get a pack if you're feeling ambitious about making multiple at once.
Acrylic Yarn - Worsted weight is ideal. You need very little per koozie—we're talking maybe 15-20 yards total. This is the perfect project for using up those random yarn scraps you've been hoarding. No judgment, we all do it.
Measuring Tape - To get your dimensions right. A standard can is about 4.75 inches tall and 8.25 inches in circumference. You'll want to tuft a piece slightly larger to account for seaming.
Fabric Scissors - Sharp ones for trimming your pile and cutting out your finished piece.
Sewing Needle and Thread - To seam the koozie closed. Or you can use fabric glue if hand-sewing makes you break out in hives.
Fabric Glue or Hot Glue Gun - For sealing the edges and attaching Velcro if you're going that route.
The Nice-to-Haves
Velcro Strips - Self-adhesive Velcro makes your koozies adjustable and reusable on different sized cans and bottles. Amazon sells these in bulk.
Fabric Marker - To draw your guidelines on the cloth. A regular pencil works too if you're not trying to be fancy.
Carpet Adhesive (small bottle) - Optional but helps seal the back and prevent shedding. A little goes a long way.
Can or Bottle for Sizing - Use an actual drink can to test fit as you go. Preferably empty unless you like living dangerously.
How to Make a Tufted Drink Koozie: Step-by-Step
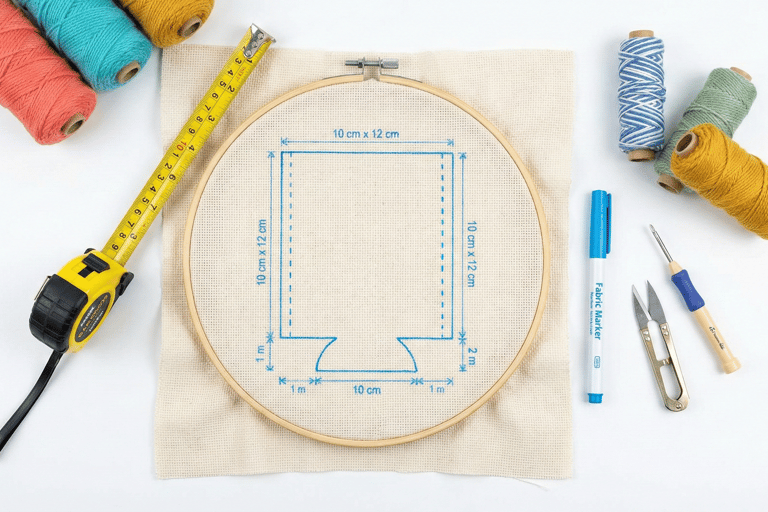
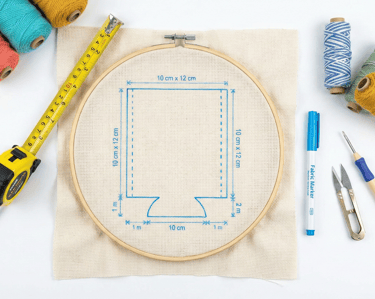
Step 1: Measure and Mark Your Rectangle
Stretch your monk's cloth in your embroidery hoop nice and tight. We're going for drum-tight here, people.
Using your measuring tape and fabric marker, draw a rectangle on your fabric. For a standard 12oz can koozie, you want approximately:
Height: 5 to 5.5 inches (slightly taller than the can)
Width: 9 to 9.5 inches (slightly wider than the circumference to allow for seaming)
Don't stress about perfection. Close enough is good enough. This is a drink koozie, not a wedding dress.
Step 2: Design Your Pattern (Or Don't)
Here's where you get to be creative. Or lazy. Both are valid choices.
Simple solid color - Easiest option. Pick one color, tuft the whole rectangle. Done. Looks clean and modern.
Horizontal stripes - Two or three colors in horizontal bands. Very nautical. Very summery. Very easy.
Vertical stripes - Same concept, different direction. Gives you practice with color changes.
Color block - Half one color, half another. Geometric and satisfying.
Ombré fade - Use 2-3 shades of the same color family for a gradient effect. Looks fancy, actually pretty simple.
Random abstract - Just wing it with multiple colors. Call it modern art. Nobody can prove it wasn't intentional.
Mark your design lightly with your fabric marker if you're doing anything beyond a solid color.
Step 3: Start Tufting
Thread your tufting gun according to the manufacturer's instructions. If you've forgotten how, YouTube is your friend. We've all been there.
Start tufting from one end of your rectangle and work your way across. Keep these tips in mind:
Go slow. Rushing leads to mistakes and uneven loops. This is 20 minutes of your life. You can afford to take your time.
Keep consistent spacing. Your loops should be close together but not overlapping. Think of them as friendly neighbors, not a mosh pit.
Maintain a perpendicular angle. Hold your gun straight up and down relative to the fabric. Angled tufting leads to wonky results.
Change colors confidently. When you hit a color change, just stop, cut your yarn, thread the new color, and continue. It's that simple.
Fill it completely. Unlike wall art where negative space can be intentional, you want your koozie fully tufted for maximum insulation.
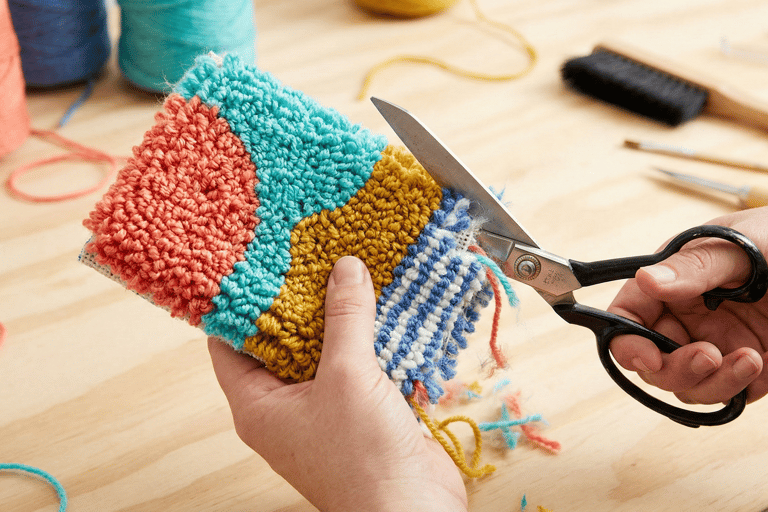
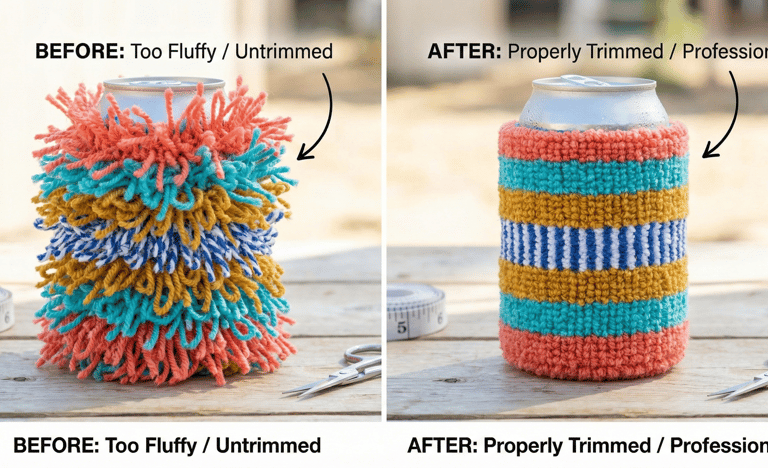
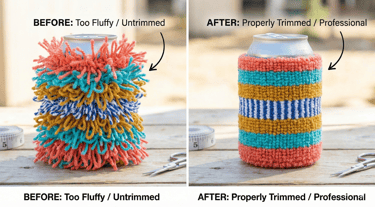
Step 4: Trim and Shape
Once your rectangle is fully tufted, it's trimming time. This is where good becomes great.
Turn off your gun and flip your work over so you're looking at the fluffy tufted side. Using your sharp fabric scissors, trim your pile to a consistent height. For koozies, you want it fairly short—maybe 1/4 to 3/8 inch pile height. Shorter pile means:
Better fit around your can
Less bulky in your hand
Easier to clean
More durable
Go over it carefully and trim any loops sticking up higher than the rest. Your goal is a nice, even surface.
Step 5: Remove and Seal
Carefully remove your tufted rectangle from the embroidery hoop. Don't yank it—be gentle. You've put work into this.
Flip it over so you're looking at the back (the side with all the yarn tails). Using your carpet adhesive, fabric stiffener, or even a thin layer of fabric glue, coat the entire back surface. This seals all those yarn ends in place and prevents your koozie from shedding all over your drink.
Let it dry completely. This usually takes a few hours. Go make another koozie while you wait. Or scroll TikTok. I won't judge.
Step 6: Cut and Prep for Seaming
Once dry, cut out your rectangle leaving about 1/4 inch border of fabric around all edges. This extra fabric will get folded under when you seam it.
If you want to be extra thorough, you can apply a thin line of fabric glue along the cut edges to prevent fraying. Not mandatory, but it adds durability.
Step 7: Seam It Into a Cylinder
Now comes the moment of truth—turning your flat rectangle into an actual koozie.
Method 1: Hand Sewing (Most Durable)
Fold your rectangle with the tufted side facing out
Match up the short edges so they overlap slightly
Using a needle and thread, whip stitch the edges together on the inside
Make your stitches small and tight
Tie off securely when done
Method 2: Fabric Glue (Faster, Less Durable)
Apply fabric glue or hot glue along one short edge
Press the other short edge firmly against it
Hold for 30-60 seconds
Let dry completely before use
Pro tip: Add a few stitches at the top and bottom for extra security
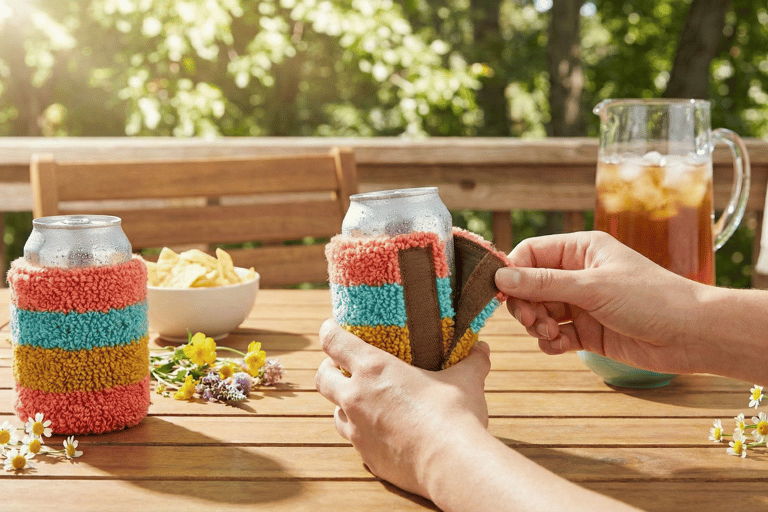
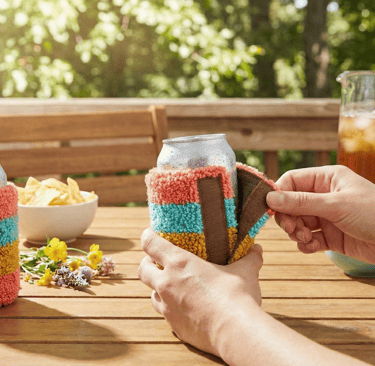
Method 3: Velcro Closure (Adjustable, Very Beginner-Friendly)
Don't seam it at all
Cut two strips of self-adhesive Velcro (about 1 inch long each)
Stick one piece of Velcro near the top edge on one side
Stick the matching piece on the opposite edge
Repeat near the bottom
Now your koozie can adjust to different sized cans and bottles
Velcro is honestly genius for beginners because it's forgiving if your measurements are slightly off.
Step 8: Test and Adjust
Grab a can (or bottle) and slip your new koozie on. How's the fit?
Too tight? Remove some stitches or make the overlap smaller. If you used Velcro, just adjust the closure.
Too loose? Add a bit more overlap when seaming, or position your Velcro differently.
Bottom edge rolling up? Trim it slightly shorter or add a thin line of glue around the bottom edge to keep it in place.
Shedding like crazy? You needed more adhesive on the back. Apply another coat to the interior and let it dry.
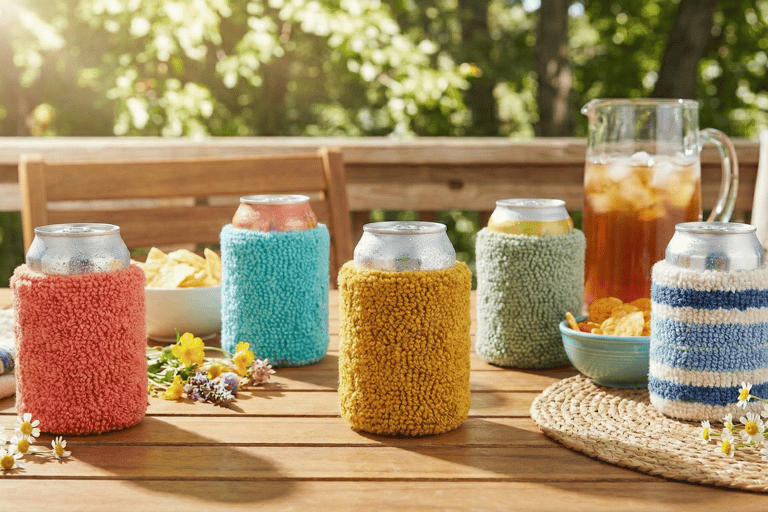
Once you're happy with the fit, you're done. Congratulations, you made a functional tufted item in under 30 minutes. Pop that cold beverage and celebrate.
Design Ideas for Your Tufted Koozies
Since these are so quick to make, you might as well have fun with the designs:
Seasonal Themes
Summer: Bright tropical colors, watermelon stripes, sunset gradients
Fall: Warm oranges and browns, pumpkin spice vibes
Winter: Cozy plaids, holiday reds and greens, snowflake white
Spring: Pastels, flower colors, fresh and bright
Personalized Sets
Make a set in each family member's favorite color
Initial of each person tufted in contrasting color
Different patterns so everyone knows which drink is theirs at parties
Party Themes
Fourth of July: Red, white, and blue stripes
Beach party: Ocean blues and sandy neutrals
Birthday: Rainbow colors or recipient's favorites
Game day: Team colors (Go local sports team!)
Mood-Based
Calm neutrals for minimalists (grays, tans, whites)
Bold brights for maximalists (hot pink, electric blue, sunshine yellow)
Earthy tones for nature lovers (forest green, rust, clay)
Pastel everything for soft aesthetic fans
Funny or Themed
Pride flags for your LGBTQ+ friends
Retro 70s color combos (mustard, burnt orange, avocado green)
Monochrome modern (all one color in different textures)
Tie-dye inspired (chaotic rainbow swirls)
Common Koozie Mistakes (And How to Fix Them)
"My koozie is too thick and bulky"
You either didn't trim short enough or your pile height is too high. Trim more aggressively. Aim for that short, dense carpet texture rather than shaggy rug vibes.
"It keeps sliding off my can"
Too loose. Make your next one slightly smaller in circumference, or use Velcro so you can adjust the fit. Also make sure you're measuring actual cans, not eyeballing it.
"The edges are fraying like crazy"
You need to seal them better. Apply fabric glue or carpet adhesive to the edges before and after cutting. Some fraying is normal, but excessive fraying means you need more sealant.
"My seam keeps coming apart"
Either your stitches are too far apart, your glue wasn't strong enough, or you didn't let it dry completely before using it. Re-seam it with smaller stitches or switch to a stronger adhesive.
"It's shedding yarn all over my drink"
Not enough adhesive on the back. Apply another coat of rug backing latex or carpet adhesive to the inside and let it dry overnight. Problem solved.
"The fit is perfect but it looks messy"
Trim it more carefully and evenly. Sometimes going over your koozie 2-3 times with scissors, snipping tiny amounts, makes all the difference between "homemade" and "handmade."
Level Up: Advanced Koozie Ideas
Once you've mastered the basic koozie, try these variations:
Bottle Koozies - Make them taller and more tapered for beer bottles or wine bottles. Just adjust your measurements accordingly.
Slim Can Koozies - For those trendy slim seltzers everyone's drinking. Measure your specific can size and adjust.
Two-Tone Split Design - Divide your rectangle diagonally and tuft each half a different color. Very modern, very eye-catching.
Name or Initial - Tuft someone's initial into the koozie in a contrasting color. Makes a great personalized gift.
Mixed Texture - If you have both cut pile and loop pile guns, use both on one koozie for added visual interest.
Matching Set with Coasters - Make coordinating koozies and coasters in the same color scheme. Very cohesive, very intentional, very impressive at parties.
Koozie with Pocket - Add a small tufted pocket on the outside to hold a bottle opener or cash. Functional and fun.
Why Koozies Are Actually Genius for Learning Tufting
Here's what nobody tells you about learning to tuft: you need quick wins. You need to finish projects and feel accomplished. You need proof that yes, you can actually do this.
Starting with a giant rug means you might spend weeks on a project before you even know if you're doing it right. That's demoralizing. Koozies give you immediate feedback. You'll know within 20 minutes if your technique needs work, and if it does, you're only out 20 minutes.
Plus, making koozies teaches you:
Tension control - You'll quickly figure out if your fabric is too loose or too tight
Even spacing - Small projects make uneven spacing really obvious
Color changes - Practice transitioning between colors smoothly
Pile height consistency - Learn to maintain the same height throughout
Finishing techniques - Sealing, seaming, and creating functional items
Measuring and planning - Getting dimensions right for specific objects
Every skill you build making koozies translates directly to bigger projects. You're not wasting time on "easy stuff"—you're building your foundation.
Your Complete Tufted Koozie Shopping List
Ready to make some koozies? Here's everything you need to add to your Amazon cart:
Electric tufting gun (cut pile) - $80-150 depending on features
Primary tufting cloth or monk's cloth - 1 yard makes 12+ koozies
Small embroidery hoop (6-8 inches) - Pack of 2-3 is useful
Acrylic yarn in fun colors - Scrap yarn works great!
Self adhesive velcro strips (optional but recommended)
Carpet adhesive or fabric stiffener (small bottle)
Beverage cans for sizing (raid your recycling bin, it's free)
Total investment if you're starting from scratch: $100-160 (mostly the gun)
Total investment if you have a gun already: Under $25 for all the koozie-specific supplies
That's less than buying a 6-pack of decent koozies from a boutique craft fair, and you can make dozens.
FAQ About Tufted Drink Koozies
How long does a tufted koozie last?
With proper sealing and decent yarn, they're surprisingly durable. I've been using mine for months with regular washing and they're holding up great. The key is good adhesive on the back and a solid seam.
Can I wash tufted koozies?
Yes! Hand wash in cool water with mild soap, then air dry completely. Don't throw them in the washing machine or dryer—they'll fall apart faster than your New Year's resolutions.
Do tufted koozies actually keep drinks cold?
Absolutely. The yarn provides insulation just like foam does, plus the texture traps air which adds to the insulation effect. They work just as well as store-bought koozies, sometimes better.
What if I don't have a tufting gun yet?
You could technically make these with punch needle, but I'll be honest—it's way slower and more tedious. If you're serious about tufting, invest in a basic electric gun. If you're not sure yet, start with coasters or a wall hanging to test if you like the craft.
Can kids make these?
With adult supervision and help with the tufting gun, absolutely! Kids love choosing colors and designing patterns. The sewing/gluing part is probably best left to adults depending on age.
How many koozies can I make from one yard of fabric?
You can comfortably get 12-15 koozies from one yard of monk's cloth, assuming standard 12oz can size. More if you're making slim can koozies, fewer if you're making bottle koozies.
Real Talk: Just Make the Koozies
You've been overthinking this tufting thing for too long. You've watched YouTube tutorials. You've saved Instagram posts. You've read articles (hi, you're reading one now). At some point, you just need to plug in that gun and make something.
Koozies are the perfect low-stakes entry point. They're fast, functional, and honestly kind of adorable. You'll use them constantly, which means every time you grab a cold drink, you get a little reminder that hey, you made something with your own hands. That feeling never gets old.
Plus, once you knock out a few koozies and realize how easy they are, you'll have the confidence to tackle bigger projects. That rug you've been dreaming about? You'll make it. That wall hanging? You'll tuft it. Those custom pet portrait pieces? Totally doable.
But it all starts with taking the first step. And honestly, that first step might as well involve a cold beverage.
Start Making Tufted Koozies Today
Stop scrolling. Stop planning. Stop overthinking.
Grab your supplies, pick your colors, and make a koozie. Just one. See how it goes. You'll probably mess something up—we all do on our first try—and that's completely fine. Make another one. By your third koozie, you'll have the process down and you'll be cranking them out like a tiny tufting factory.
Before you know it, you'll have a drawer full of handmade koozies in every color, and you'll be the person who shows up to summer barbecues with the coolest drink accessories. Your friends will ask where you got them. You'll casually say "Oh, I made them" and bask in the compliments.
That's the dream. Now go make it happen.
Your cold drinks are waiting. 🥤✨


Cozy updates on tuft rugs and tufting tips
Contact
Hello@TuftMom.com
© 2026. All rights reserved.