Tufted Coasters for Beginners
Learn to make adorable tufted coasters with our beginner-friendly guide! Complete Amazon shopping list, step-by-step instructions & tips included.
PROJECTSHOW TO
Caro
1/20/20268 min read

Tufted Coasters for Beginners: Your Gateway Drug to Rug Addiction
FTC Disclaimer: This post contains affiliate links to Amazon products. If you purchase through these links, I may earn a small commission at no additional cost to you. These commissions help keep TuftMom running and my yarn stash... well, stashed.
Listen up, aspiring tufters: I know you want to dive in and make a 6x8 foot masterpiece rug on your first try. I see you eyeing those gorgeous Instagram rugs with the intricate designs and thinking "how hard can it be?"
Let me stop you right there.
You know what's NOT fun? Spending 40 hours on your first project only to realize halfway through that you hate the colors, your technique is wonky, and you've basically created a very expensive floor disaster. You know what is fun? Making adorable tufted coasters that take 30 minutes each, teach you all the basics, and actually turn out cute enough to use (or gift to your friends who will be very impressed).
Welcome to Tufted Coasters 101: where we learn to walk before we try to run a tufting marathon.
Why Coasters Are the Perfect First Project
They're small - We're talking 4-5 inches diameter. You can finish one in a single sitting. No multi-week commitments here.
They're cheap - Mess up? No big deal. You're out maybe $2 in yarn, not $50.
They're actually useful - Unlike that experimental rug you'll shove in a closet, coasters protect your furniture. Your future self with a water ring on their coffee table will thank you.
They teach you EVERYTHING - Color changes, shape control, finishing techniques, tension management. It's like tufting school, but cuter and more caffeinated.
They make excellent gifts - Nothing says "I care about you AND your furniture" like handmade coasters. Plus, people will think you're way more talented than you actually are at this point. Win-win.
What You Need From Amazon (The Short List, I Promise)
The Absolute Essentials
Cut Pile Tufting Gun - Look for a basic, affordable electric tufting gun. You don't need all the bells and whistles for coasters. Adjustable speed is nice but not essential. We're making drink holders, not heirlooms.
Budget range: $80-150. Yes, it's an investment, but consider how much you've spent on other hobbies you quit after two weeks. At least this one produces coasters.
Primary Tufting Cloth or Monk's Cloth - You need maybe a yard to make a whole set of coasters. Get the good stuff with a tight weave so your tiny loops actually stay in place. Cheap fabric = coasters that shed more than your golden retriever.
Small Embroidery Hoop or DIY Frame - Here's a secret: you don't need a giant tufting frame for coasters. A 10-12 inch embroidery hoop works PERFECTLY and costs like $8. Just make sure it's sturdy enough to keep your fabric taut.
Or, if you're feeling fancy, grab some wood stretcher bars and make a tiny frame. But honestly? Embroidery hoop. Life's too short.
Acrylic Yarn in Your Favorite Colors - For coasters, you need very little yarn per coaster. A small skein makes multiple coasters. Pick 2-3 colors that match your decor, or go wild with a rainbow. This is your chaotic craft project; I'm not the boss of you.
Weight recommendation: Worsted or bulky weight works great for coasters. You want good coverage without making them so thick they don't sit flat.
Fabric Scissors - Sharp ones. Don't use your kitchen scissors unless you want your partner to file for divorce. Dedicated craft scissors from Amazon will change your life.
Carpet Adhesive or Hot Glue Gun - To seal the back of your coasters and make them actually functional instead of just decorative yarn circles.
Felt or Cork Backing - Cut into circles to finish the bottom. Felt is softer, cork is more traditional coaster-like. Both work great and are cheap on Amazon.
The Nice-to-Haves
Circle Template or Compass - To draw perfect circles on your fabric. You could trace a cup, but let's be adults here.
Fabric Marker - For outlining your design. Get one that shows up on your fabric color.
Rug Backing Latex (Small Bottle) - More professional than hot glue if you're feeling fancy, but truly optional for your first batch.
The Step-by-Step (AKA How Not to Screw This Up)
Step 1: Set Up Your Workspace
Stretch your monk's cloth in your embroidery hoop TIGHT. Like, really tight. Loose fabric is the enemy of good tufting. If you can still see any give when you push on it, tighten more.
Pro tip: Do this near good lighting and preferably NOT on your bed. Yarn fuzz gets EVERYWHERE, and your sheets will look like a craft store threw up on them.
Step 2: Draw Your Circle
Using your template or compass, draw a 4-5 inch circle on your fabric with your fabric marker. Keep it simple for your first coaster. A perfect circle is design enough.
Feeling adventurous? Draw a simple design inside—a heart, a star, a smiley face, whatever makes you happy. Just keep it SIMPLE. Save the portrait of your cat for later when you actually know what you're doing.
Step 3: Thread Your Tufting Gun
Follow your gun's instructions. Watch a YouTube video if needed. This part can be finicky the first few times, and that's normal. You're not broken, your gun's not broken, you just haven't done this a million times yet.
Make sure your yarn feeds smoothly. If it's catching or breaking, you've threaded it wrong. Ask me how I know. (Spoiler: I spent 45 minutes on my first coaster wondering why my yarn kept snapping before realizing I'd threaded it backward.)
Step 4: Start Tufting!
Hold the gun perpendicular to your fabric - Not at an angle. Straight up and down. This is important. Angled = wonky loops = sad coaster.
Work from the outside in - Start at the edge of your circle and work your way toward the center. This helps maintain shape control.
Go SLOW - This isn't a race. Slow and steady wins the coaster game. Fast and furious gets you uneven loops and frustration.
Keep consistent spacing - Your loops should be close together but not overlapping. Think "friendly neighbors" not "overcrowded subway."
Change colors as needed - If you're doing a two-tone design, just stop, cut your yarn, thread the new color, and keep going. Simple!
Step 5: Trim and Shape
Once you've filled in your circle (or design), turn off your gun and assess. You'll probably have some uneven spots or loops sticking up. That's what scissors are for!
Trim everything to a consistent height. For coasters, you want them pretty short—maybe 1/4 to 1/2 inch pile height. Nobody wants a shaggy coaster that tips their drink over.
Use your scissors to really define the circle edge. Make it crisp. Make it clean. Make it look intentional instead of "I kinda sorta tried to follow a line."
Step 6: Remove From Frame and Cut Out
Take your tufted piece out of the hoop. Using your fabric scissors, cut around your circle leaving about 1/2 inch border of extra fabric all the way around.
This extra fabric will get glued down on the back, so don't cut too close to your tufted edge or everything will fall apart and you'll cry into your yarn stash.
Step 7: Seal and Back
Flip your coaster over. You're looking at the back of your tufting—all those yarn tails and loops. Beautiful chaos.
If using hot glue: Carefully apply hot glue all over the back, making sure to hit all the yarn ends. Work quickly because hot glue dries fast. Fold your excess fabric edges in and press them into the glue.
If using carpet adhesive/rug latex: Brush it on generously over all the yarn backs. Let it dry completely (this takes a few hours—go make another coaster while you wait). Then fold and glue down your excess fabric edges.
Cut your felt or cork backing into a circle slightly smaller than your coaster. Glue it on the back to cover all the messy bits.
Boom. Professional-looking coaster.
Step 8: Admire Your Work
Put that bad boy on your coffee table. Set a drink on it. Take a photo for Instagram. Feel unreasonably proud of yourself for making a functional object with your own hands.
You're a tufter now. Welcome to the club.
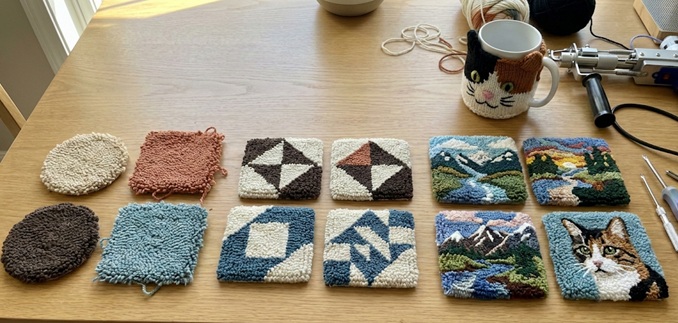
Design Ideas for Your First Set
Start with simple, beginner-friendly designs:
Solid Color Circles - Sometimes simple is best. Pick a bold color that matches your living room.
Two-Tone Split - Half one color, half another. Easy color change practice.
Ombre Effect - Use 3-4 shades of the same color family, working from light to dark. Fancy looking, surprisingly easy.
Simple Shapes - A heart, star, or smiley face in the center with a different colored border.
Color Block Geometric - Divide your circle into quarters or thirds with different colors. Modern and fun.
Speckled/Confetti - Random small patches of different colors on a base color. Mistakes just look intentional!
Save the detailed floral patterns and portrait work for when you're not Googling "how to thread a tufting gun" every five minutes.
Common Beginner Coaster Disasters (And How to Avoid Them)
The Wobbly Circle - Your coaster looks more like a demented potato than a circle. Fix: Use a template. Trace carefully. Trim more carefully. Your eyes are not as accurate as you think they are after three hours of tufting.
The Shedding Nightmare - Your coaster leaves yarn trails everywhere like Hansel and Gretel. Fix: Use more adhesive on the back. Like, way more. Don't be shy with the glue.
The Lumpy Situation - Your coaster has hills and valleys. Drinks slide off in terror. Fix: Trim more aggressively and evenly. Use your hand to feel for high spots while trimming.
The "It Won't Lay Flat" Problem - Your coaster curls up at the edges like it's trying to become a bowl. Fix: Use more adhesive, make sure your backing is secure, and place it under a heavy book overnight.
The Color Bleed - Your colors aren't staying in their lanes; they're mingling inappropriately. Fix: Slow down at color transition points. Pull out loops that are in the wrong section. Yes, it's tedious. Yes, it makes a difference.
Leveling Up: Once You've Made a Set
Okay, so you've made 4-6 coasters and you're feeling yourself. Your technique is solid. Your circles are actually circular. Your friends are impressed. What now?
Try different shapes - Squares, hexagons, even cloud shapes if you're feeling whimsical.
Add texture - Mix loop pile and cut pile if you have both guns (or can afford to buy one).
Get detailed - Try small patterns, initials, simple images.
Experiment with materials - Try different yarn types, weights, or even mixing materials.
Make themed sets - Seasonal coasters, holiday coasters, coasters for specific rooms.
Gift them strategically - Housewarming gifts, host/hostess gifts, "I'm sorry I'm a terrible friend" gifts. Coasters work for all occasions.
The Real Talk: Why Coasters Matter
Look, I know you bought a tufting gun with dreams of making that epic 8-foot rainbow rug you saw on Pinterest. And you will! Eventually. But starting with coasters is not settling—it's being smart.
Every expert tufter started somewhere. Most of them have a drawer full of wonky first projects they'll never show anyone. By starting with coasters, you're:
Learning proper technique without committing to weeks of work
Building muscle memory for how to hold and move the gun
Understanding yarn behavior and tension
Developing an eye for design and color combinations
Practicing finishing techniques that you'll use on every project
Actually completing projects which is HUGE for motivation
Plus, you'll have coasters. And everyone needs coasters. It's a win all around.
Your Amazon Shopping List (Quick Reference)
Ready to start? Here's what to add to your cart:
Electric tufting gun (cut pile)
10-12 inch embroidery hoop (or small frame supplies)
Acrylic yarn in 2-3 colors (worsted or bulky weight)
Felt or cork sheets for backing
Optional: Rug backing latex for a more professional finish
Final Thoughts: Just Start Already
You've read this whole article. You're clearly procrastinating actually starting your tufting journey. I get it—new hobbies are scary. What if you're bad at it? What if your coasters look terrible? What if you waste money on supplies you never use?
Here's the thing: your first coaster probably WILL be a little wonky. The circle might not be perfect. The loops might be uneven. And you know what? You'll still use it. You'll still be proud of it. And the second one will be better. The third one even better than that.
The only way to get good at tufting is to actually do it. And coasters are the perfect low-stakes way to start.
So stop overthinking it. Add that stuff to your Amazon cart. Hit buy. Wait impatiently for shipping. Then grab that tufting gun and make something.
Your coffee table is waiting. ☕
Cozy updates on tuft rugs and tufting tips
Contact
Hello@TuftMom.com
© 2026. All rights reserved.