Welcome to Rug Tufting: What It Is and The Essential Gear You Need to Start
Want to start rug tufting? Our beginner guide covers the best tufting guns, essential gear, and a full shopping list to help you make your first custom rug.
GETTING STARTED
Caro
1/3/20255 min read

This post contains affiliate links. If you use these links to buy something we may earn a commission at no extra cost to you. Thanks for your support
If you’ve spent any time on TikTok or Instagram recently, you’ve seen it: a rapid-fire machine shooting yarn into cloth, transforming a sketch into a fluffy, colorful rug in minutes. It is hypnotic, satisfying, and looks incredibly fun.
This is rug tufting, and it is currently the hottest fiber art trend in the world.
What used to be an industrial process has been simplified for the home hobbyist. Now, with a few hundred dollars and a weekend of practice, you can create custom floor rugs, wall hangings, and fluffy mirrors right in your living room.
If you are ready to jump in, this guide is your roadmap. We will cover what tufting actually is, the specific gear you need and how to get started.
Part 1: What Actually Is Tufting?
Tufting is essentially painting with yarn.
In traditional rug making, every knot is tied by hand—a process that takes hundreds of hours. Tufting speeds this up by using a tufting gun. This power tool works like a handheld sewing machine. It pushes a needle through a fabric backing, shoots a strand of yarn through to the other side, and leaves a loop.
When you do this thousands of times in tight rows, you create a plush carpet.
The Two Styles You Need to Know: Before you buy a gun, you need to understand the two types of pile:
Cut Pile (The Most Popular): The gun has built-in scissors that cut the yarn after every loop. This creates a shaggy, upright "velvet" texture. 90% of the viral videos you see use Cut Pile.
Loop Pile: The gun leaves the yarn in uncut loops. This creates a nubby, durable finish that looks like a traditional Berber carpet.
Part 2: The Complete "Starter Pack" Shopping List
You cannot just grab some glue and yarn from the dollar store and hope for the best. Tufting requires specific tools to handle the high speed and tension of the process.
Here is exactly what you need to buy to set yourself up for success.
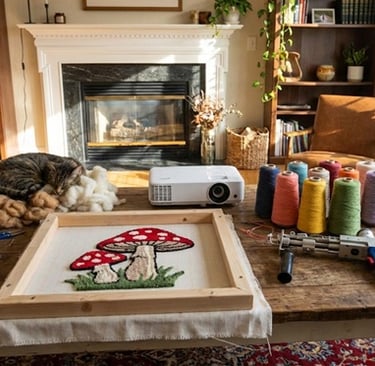
1. The Tufting Gun
This is your biggest investment. On Amazon, there are dozens of listings, but they mostly fall into two categories. For a beginner, you want a 2-in-1 electric gun. These allow you to switch between Cut Pile and Loop Pile, giving you the most versatility.
Option A: The Best Seller (Budget-Friendly & Reliable) The BESGEER This is the "Honda Civic" of tufting guns. You will see this blue gun in almost every YouTube tutorial. It is lightweight, reasonably priced, and parts are easy to find. It usually comes as a 2-in-1 model (standardized as the AK-I or AK-II).
Why it's great: It’s affordable and has a massive community of users, so troubleshooting is easy.
Best for: The absolute beginner who wants to start without spending a fortune.
Option B: The Modern Upgrade (Quieter & Tech-Heavy) The AK-V Style (Often listed as "Upgraded Tufting Gun with Display") If you have a slightly higher budget or live in an apartment with thin walls, look for the newer models that feature a digital display screen on the handle.
Why it's great: These use a brushless motor, making them significantly quieter than the standard blue guns. The digital display also shows your speed, which is very helpful for learning control.
Best for: Apartment dwellers or those who want a smoother, quieter experience.
2. The Fabric (The Canvas)
Do not use burlap. Burlap is cheap, but it is brittle and will tear under the force of the tufting gun, ruining your project.
You need Primary Tufting Cloth. This is a specialized polyester/cotton blend (usually grey or white) that is loose enough to let the needle pass through but strong enough not to rip. Look for the cloth that has yellow marking lines woven into it—these lines are a lifesaver for keeping your gun straight.
3. The Frame (The Skeleton)
To tuft, your fabric must be stretched drum-tight. You cannot hold it in your hand.
DIY Route: You can build a frame using 2x4 wood and "carpet tack strips" (the spiky wooden strips used in home flooring).
The Easy Route: If you aren't handy with a saw, buy a tabletop frame kit. These clamp directly to your desk and come with the tack strips pre-installed.
4. The Yarn (The Paint)
Practice Yarn: Start with 100% Acrylic Yarn (Medium/Worsted Weight size 4). It is cheap, comes in bright colors, and is easy to gun. Brands like Red Heart Super Saver are the industry standard for beginners.
Pro Yarn: Once you get good, switch to 100% Wool. It is more expensive but lasts for years and feels luxurious.
5. Carpet Adhesive (The Glue)
Once you finish tufting, if you pull a piece of yarn, it will fall right out. You must glue the back to lock the loops in place. You need a flexible flooring adhesive. Roberts 3095 is the gold standard in the US tufting community. Do not use Elmer's glue (it cracks) or hot glue (it’s too messy).
6. Rug Carving Clippers (The Polish)
This is the secret ingredient to making your rugs look professional. When you take the rug off the frame, it will look a bit messy and uneven. You use these sheep-shear style clippers to shave the rug down, creating a crisp, smooth surface and carving out definition between colors.
Part 3: How to Make Your First Rug (A Quick Overview)
Once your Amazon boxes arrive, here is the basic workflow:
Stretch the Cloth: Hook your primary cloth onto the tack strips of your frame. Pull it tight—it should sound like a drum when you flick it.
Trace Your Design: Use a projector or freehand a design onto the cloth using a permanent marker. Remember to flip your image horizontally (mirror image) because you are tufting from the back!
Thread and Tuft: Thread your gun (using a yarn threader). Place the needle against the cloth, apply pressure, and pull the trigger. Always move the gun in the direction the foot is facing (usually up).
Glue It: While the rug is still on the frame, spread a layer of carpet adhesive over the back. Let it dry for 24 hours.
Back and Finish: Cut the rug off the frame. Glue a backing fabric (like felt or non-slip cloth) to the back to hide the messy glue.
Shave and Carve: Use your clippers to shave the top of the rug to an even height and carve "V" channels between colors to make the design pop.
Final Thoughts: Is It Hard?
Tufting has a learning curve, but it is a short one. Your first few lines might look wobbly, and you might tear the cloth once or twice. That is normal. However, most people are comfortable with the machine after about an hour of practice.
It is a loud, active, and incredibly rewarding hobby. There is nothing quite like the feeling of taking a pile of yarn and turning it into a physical, fluffy object that you can use in your home.
Ready to start? Grab your gear, pick a simple design, and happy tufting!
Cozy updates on tuft rugs and tufting tips
Contact
Hello@TuftMom.com
© 2026. All rights reserved.